How NASA (and you!) can make full color images from the James Webb Space Telescope
You’ve probably seen at least one of the stunning first pictures from the James Webb Space Telescope (JWST), released by NASA on July 12th. The pictures are meant to showcase the capabilities of JWST, and they do a spectacular job, with views of the SMACS 0723 galaxy cluster, Southern Ring Nebula, Carina Nebula, Stephan’s Quintet of galaxies, and more. You may also have heard that those images are false color – and possibly felt a little betrayed by this manipulation of the facts. But fear not! Astronomers don’t just color in astronomical images however they want – there’s a method to their madness. Even better, that method is straightforward, and with the right tools you can easily recreate the beautiful full-color images yourself! In this post I’ll talk about why the false coloring is necessary in the first place, and then guide you through the steps to download the raw images from NASA and combine them into your own colorful masterpiece.
Unlike the cameras that you might use every day, telescope cameras can’t take color pictures. The colored images you see are made by adding false color to the black-and-white images taken by the telescope. Multiple images are taken, using different filters. By adding color to the different images and layering them together, astronomers create the full color images we all love.
Each filter allows light of only certain wavelengths through. So the color in these “false color” images corresponds to the wavelength of the light, just like how the “true colors” we see with our eyes correspond to the wavelength of the light we see. But astronomers aren’t limited to the tiny slice of the full light spectrum that we can see with our eyes, so the colors don’t match exactly.
JWST is an infrared telescope, so the light it’s built to detect is invisible to the human eye. An image may be colored like light we can see, but it actually represents light with wavelengths 10-30 times longer than is visible to humans. In this graphic from JWST, the filters used are listed below the image, with the text color corresponding to the color used for that image. It was taken with the mid-infrared camera, so the shortest wavelength shown (colored dark blue), is around 7 microns, or 10 times longer than the reddest light visible to humans.
Making your Own
And as promised, now I’ll tell you how to do it on your own!
We’ll go over some software that you can use to open and play with the files, how to download the raw files straight from NASA, and then how to color and combine them.
Software
The image files we’ll get from JWST are in a special file format called “fits”. If you’ve never heard of it, you’re not alone. Flexible Image Transport System files were specifically designed by astronomers to use for astronomical data. They have a few special features, like the ability to store text information about the observations, but we’ll just be using the image part of the file. However, most image editors can’t open fits files, so we will need a special editor to see them.
The software we will use is called DS9 and it can be downloaded free here.
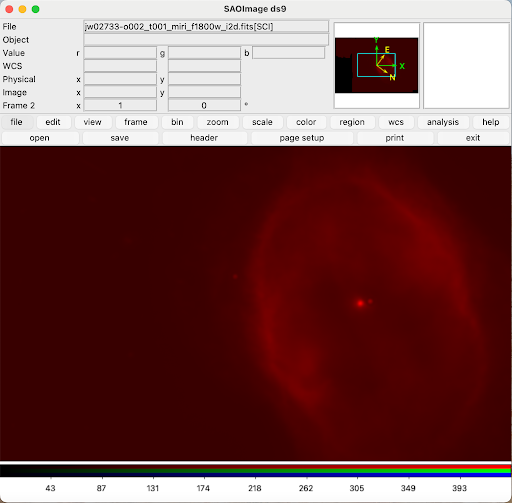
Once you’ve downloaded the software go ahead and open it up, and you should see something like this:

Great! For a more general overview of DS9 and its features check out this great post from AstroBites.
Raw Image Download
Now let’s download the images so that we have something to look at.
You can get the full-color versions of any of the JWST photos on the JWST site, but we want the original versions, which are a little harder to find. We’re going to use the mid-infrared images of the Southern Ring Nebula, but you can repeat this for any of the JWST images.
- Go to this website https://mast.stsci.edu/portal/Mashup/Clients/Mast/Portal.html
- At the top center of the screen click ‘Advanced Search’. This will open a pop-up with a grid of filters you can choose from.
- Now, under the “Mission” filter (top row, third column), expand out the list and then select JWST.
- In the ”Object” filter (top row, first column), type NGC 3132 and hit enter.
- Now in the “Instruments” filter, type MIRI in the search bar and press enter. At the top of the pop up it should now say “Records found: 4.”
- Press the “Search” button (top left).
- In the center of the screen you should now see a list of 4 items. These are the four different filters that were used to image the nebula.
- Select all four items and then add them to the download basket by pressing the button that looks like a basket. This will open the download manager pop-up, which may take a minute to load.
- This will show you the 20 files related to those observations that you can download. You can download them all and pick the ones we need later, or expand them out and pick the three we want:
- jw02733-o002_t001_miri_f1280w_i2d.fits
- jw02733-o002_t001_miri_f1800w_i2d.fits
- jw02733-o002_t001_miri_f770w_i2d.fits
10. Once you’ve selected the files we need, click the download button, which will download them all in a zipped file.
Now that we’ve got the software and the files, we can finally get started.
- Open DS9 and click “frame” (fourth in the top button row)
- Click “rgb” (second in the bottom button row). This opens an rgb frame that will allow you to open any three different files and color them red, blue and green. You should see a small window listing red, green and blue frames. Your current frame, and which frames are currently visible are checked.
- With “red” as your current image, click on “file” in the main window (first in the top row), and then “open” (first in the bottom row). In the file window, navigate to where you saved the raw files and open the one that has “1800” in the file name. This will be our red image.
- Now select “green” as your current image and open the file that has “1280” in the file name.
- Lastly, select “blue” and open the file with “770” in the file name.
- We’re going to focus on one image at a time, so for now unselect the “View” box for the green and blue images, and check the “current” box for red. You should see this:
7. To see the whole image, click “zoom” (sixth on the top row), and then “zoom fit” (third on the bottom row).
8. Now we’re going to mess with the image scaling – the brightness and contrast. Go to the “scale” tab (seventh on the top row), and then click on “zscale” (last on the bottom row). This should make the image brighter.
9. To manually adjust the image brightness and contrast, right click over the image display (or control + click for a Mac). While holding right click, move your mouse up or down to decrease or increase the image contrast, and right or left to increase or decrease the brightness.
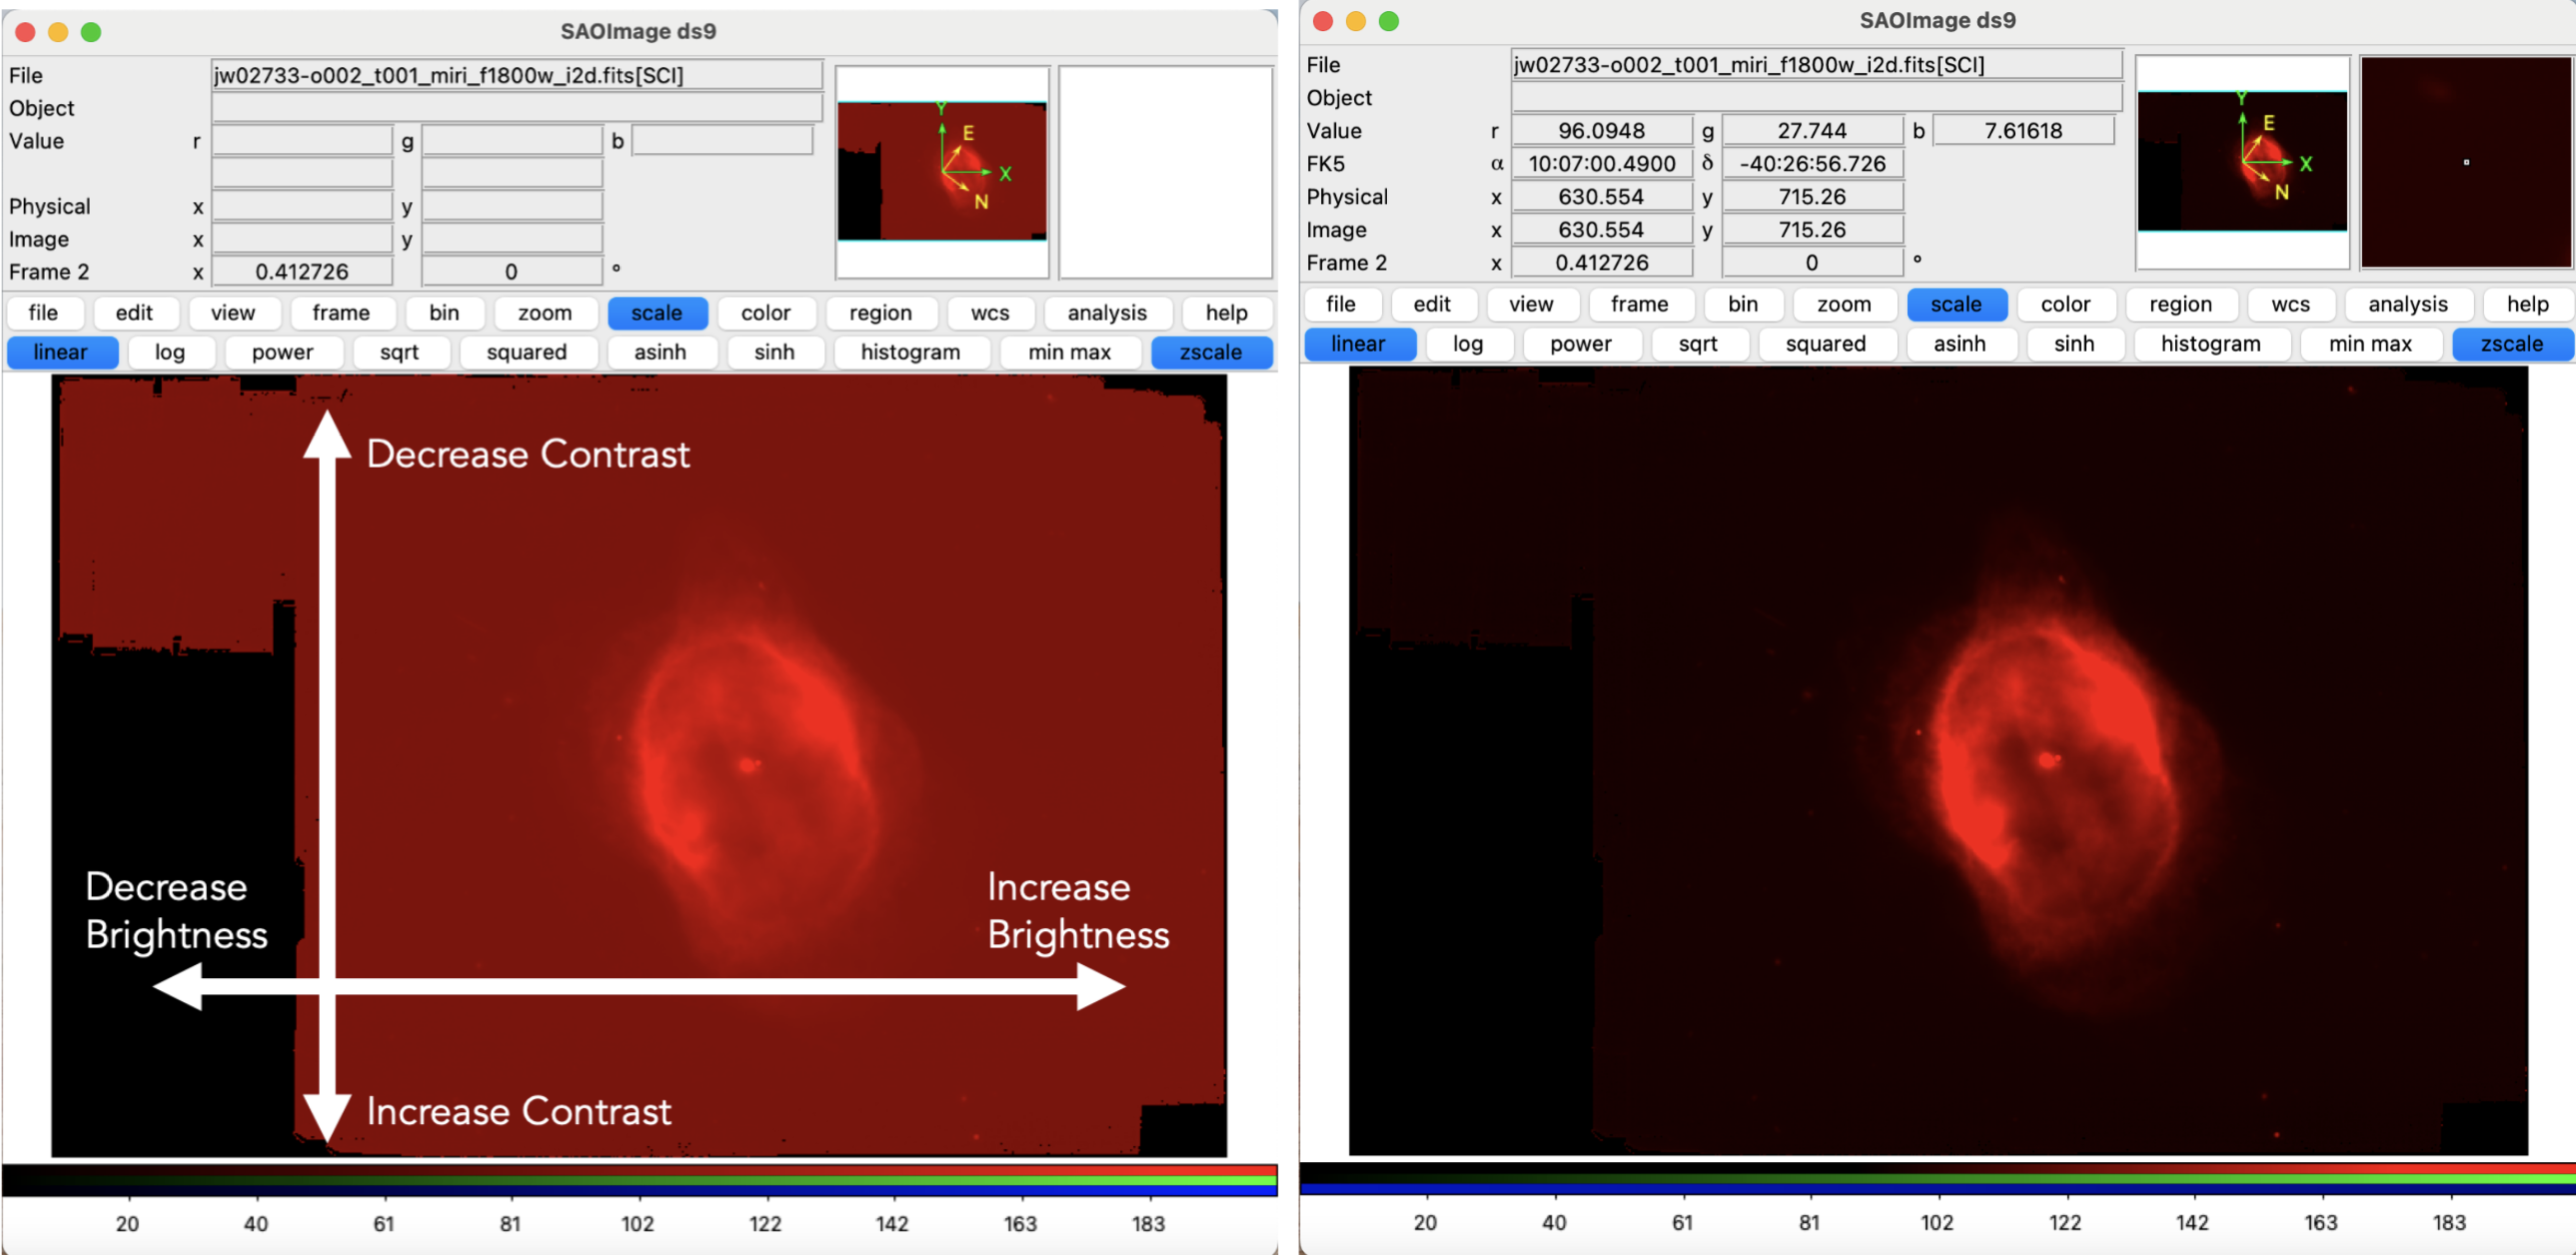
Here, the image on the left is what it looked like before I changed anything, and the image on the right is what I ended with. The key features I was looking for were: not washing out the detail in the center of the nebula, not making the edges too faint, and a fairly (it doesn’t have to be perfect) black background, but you can use your own creative judgment!
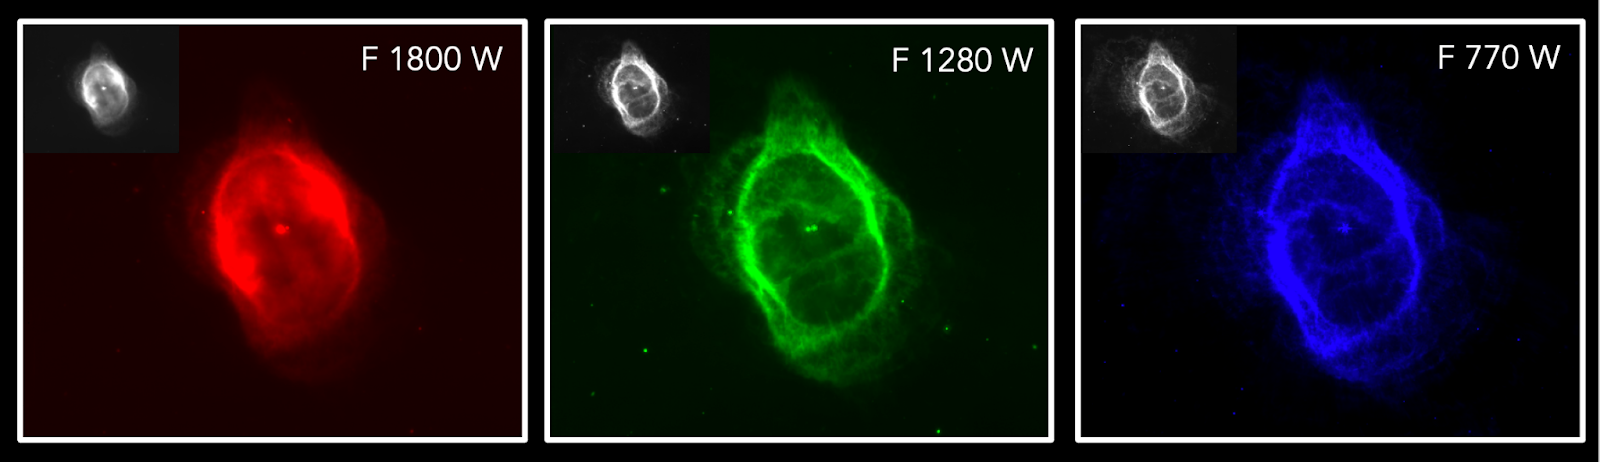
10. Repeat step 9 with the green and blue images, adjusting the contrast and brightness to bring out the details and keep the background dark. Here’s my three images after I adjusted each of them.
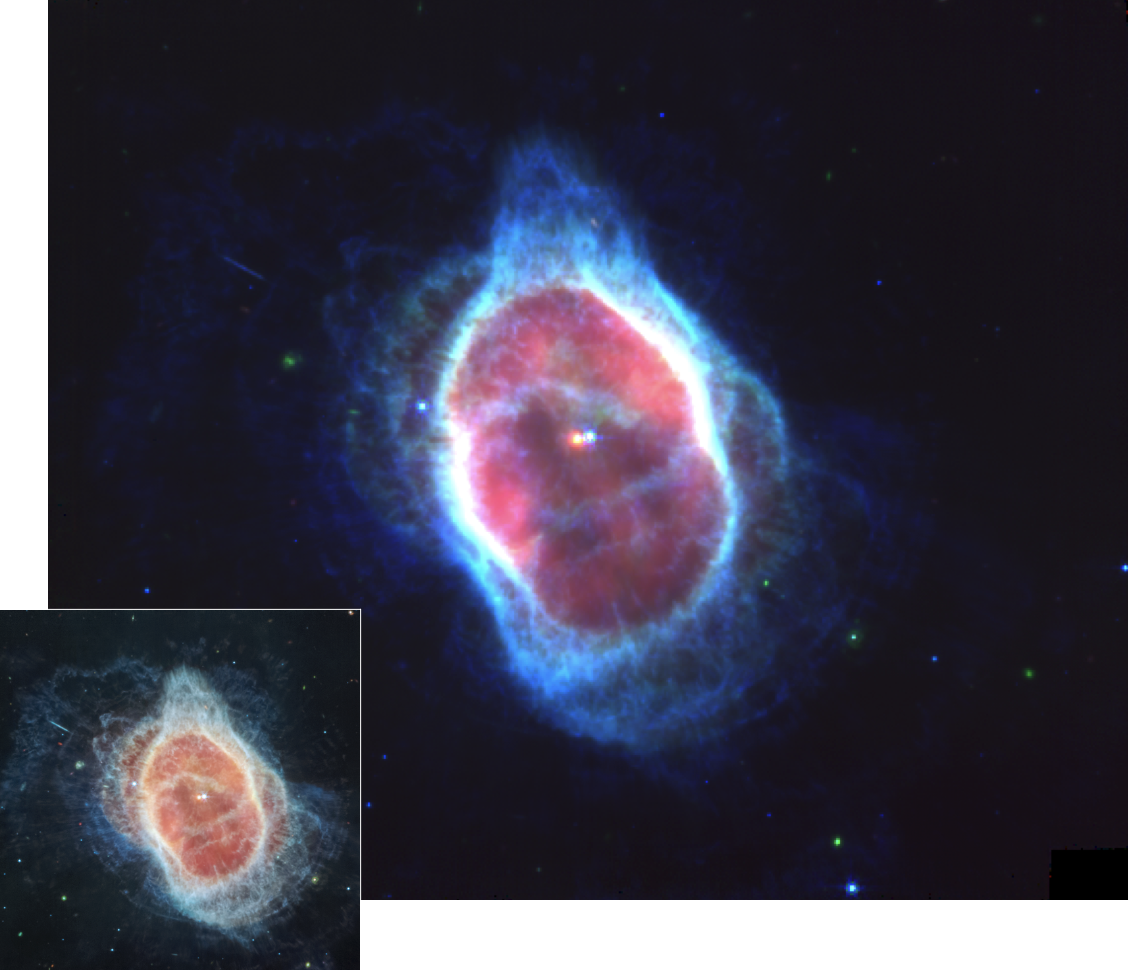
11. Now toggle on the view for all three, and you should see your finished product! Here’s mine, alongside the NASA version, which uses a fourth filter and some much nicer editing software.
You can do this for any images you want from JWST (and other space telescopes). To download a different set of raw images just change the filters you used to find the Southern Ring Nebula images on the data portal from step 4 of that section. You’ll need the NGC names for the object you want to see, but that can be found easily on the wikipedia page for different astronomical objects (for example, the Carina images can be found under “NGC 3324”).
Peer Editors: Brittany Shepherd and Taylor Tibbs
Thank you for sharing your informative and valuable content.